Channel
Channels are a fundamental concept in Hyperledger Fabric, allowing for the creation of isolated communication paths between different organizations. In this section, we will guide you through the process of creating a channel using GoFabric.
Create a Channel
To be able to create a channel, you need to have an business group created in the system. If you haven't created a business group yet, please refer to the Creating a Business Group guide.
Proposing a Channel creation
As any operation in the business group, creating a channel requires the approval of the organizations that are part of the business group. This is done through a proposal process, where the organizations can accept or reject the proposal.
To create proposal to create a channel, follow these steps:
- Navigate to your Business Group Dashboard: In the left sidebar, you will see a Channels tab. This tab allows you to view and manage the channels associated with your business group.
-
Creating a Channel: To create a new channel:
- Click on the New Channel button to go to the channel creation screen.
-
Fill out the required details Name, Description, and choose the nodes that will be part of the channel.
Note
The addition of peers from organizations that you are not a member must be done later by the organization that owns the peer. - Click Create Channel to create the channel.
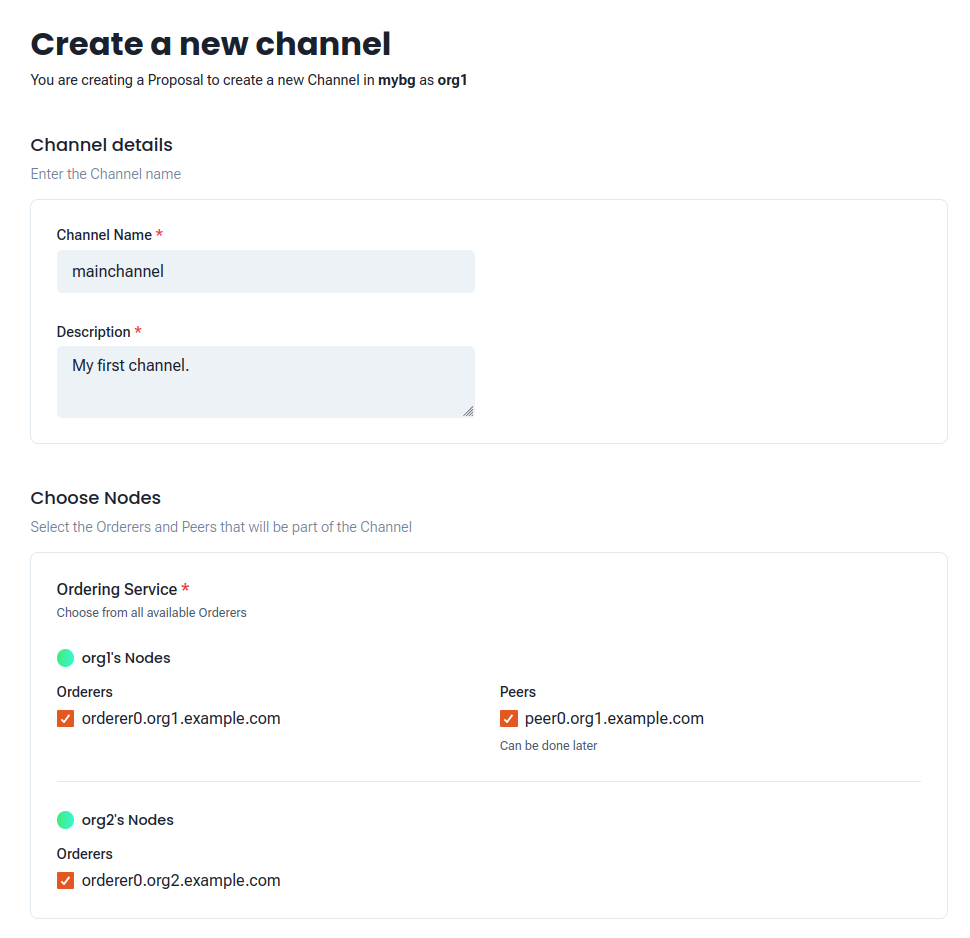 Figure 1: Example of creating a channel
This will create a new create channel Proposal. You will be redirected to the business group Proposals tab, where you can see the list of proposals associated with your business group. The proposal will be in Pending status until it is approved by the selected organizations.
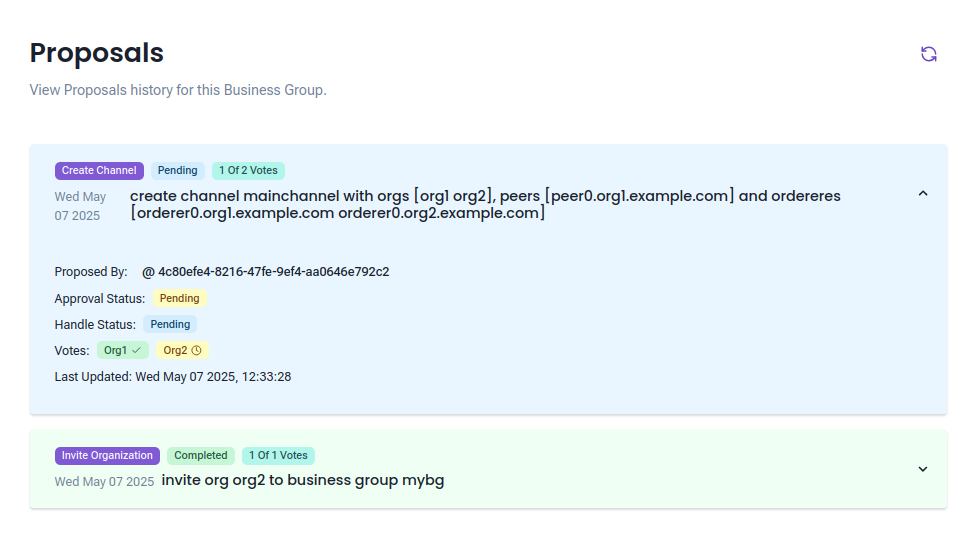 Figure 2: Example of creating a channel proposal
The channel proposal will be sent to the selected organizations for approval. Once the proposal is approved, the channel will be created and the selected organizations will be added to the channel.
-
Accepting the proposal: In the business group dashboard, the organizations can accept or reject the proposal. If the organization accepts the proposal, it will be added to the channel and will be able to participate in the channel activities.
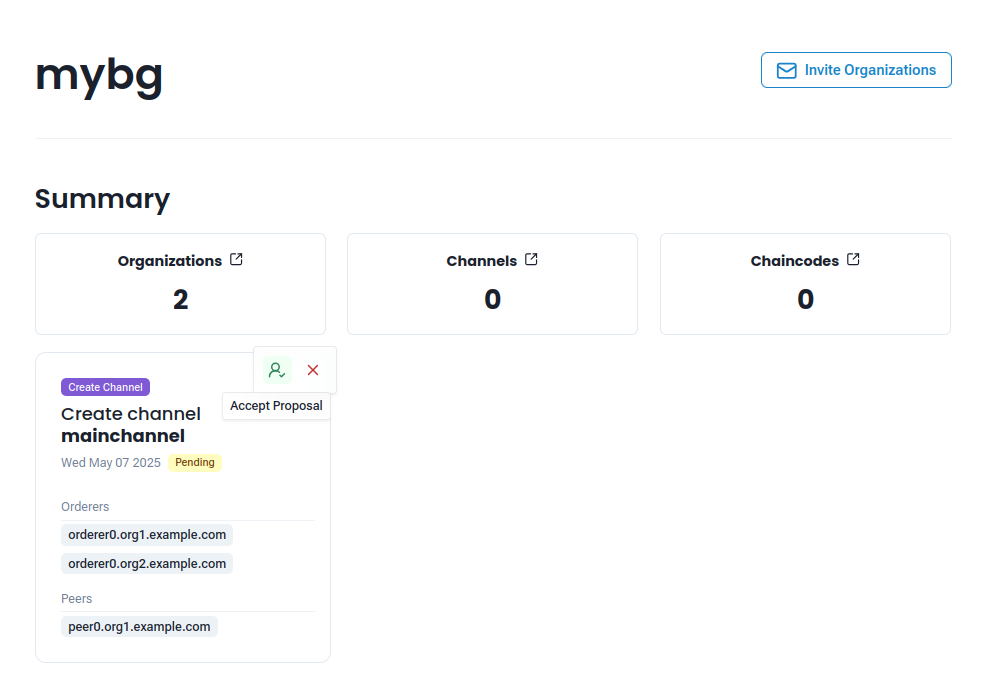 Figure 3: Example of accepting a channel proposal
To accept the proposal, hover over the proposal and click on the Accept Proposal button. Once the proposal to create a channel is accepted, the create channel operation will be initiated. If successful, the channel will be created and the selected organizations will be added to the channel. You can check the status of the proposal in the Proposals tab in the business group dashboard.
You can see more about the Proposals in this guide Proposals.
Channel Dashboard
Through the Channels tab in the business group dashboard, you can see the list of channels associated with your business group. By clicking on the channel name, you will be redirected to the channel dashboard, where you can see the details of the channel and its members.
Channel Details
The channel dashboard provides an overview of the channel and its members. You can see the list of organizations that are part of the channel, as well as the chaincodes associated with the channel and the chain information.
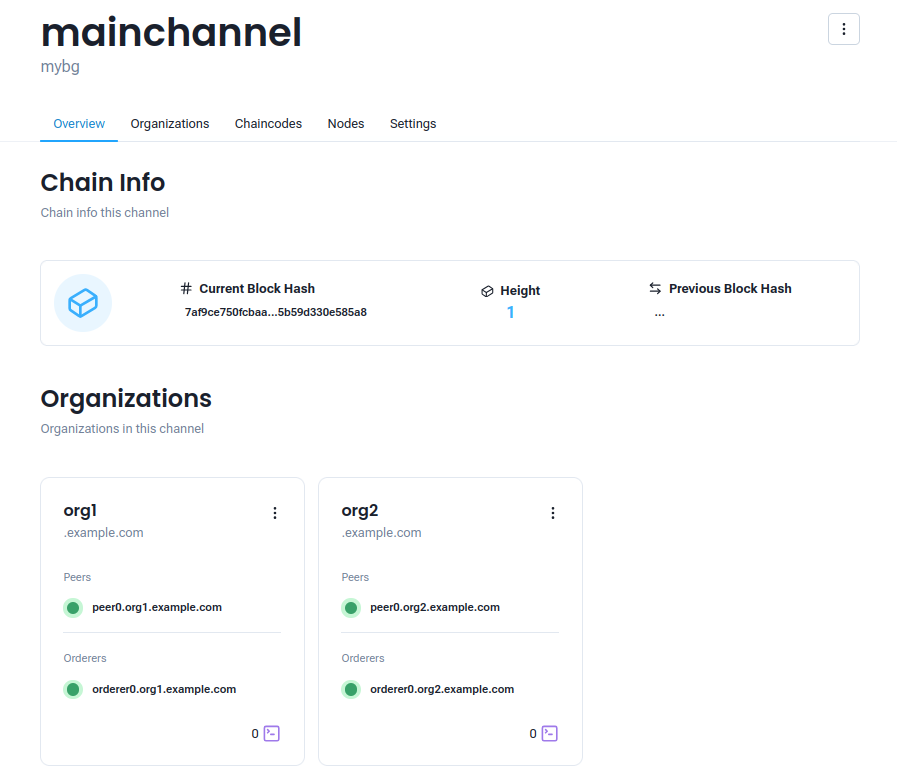 Figure 4: Example of channel dashboard
Add Organizations to a Channel
To add an organization to a channel, you need to create a proposal to add the organization to the channel. This is done through the channel dashboard.
Proposing to add an organization
To add an organization to a channel, follow these steps:
Note
Only the organizations that are part of the business group can be added to the channel. If you want to add an organization that is not part of the business group, you need to invite them to join the business group first.
- Navigate to the Channel Dashboard: In the left sidebar of the business group dashboard, you will see a Channels tab. This tab allows you to view and manage the channels associated with your business group.
- Select the Channel: Click on the channel name to go to the channel dashboard.
-
Adding an Organization: With the organization you want to add to the channel:
- Click on the three dots on the top right of the channel dashboard and select Request to Join Channel.
- Select which roles you want to assign to the organization in the channel:
- Application: You will be able to select the peers that will be part of the channel.
- Orderer: You will be able to select the orderers that will be part of the channel.
- Click on Submit to create the proposal to add the organization to the channel.
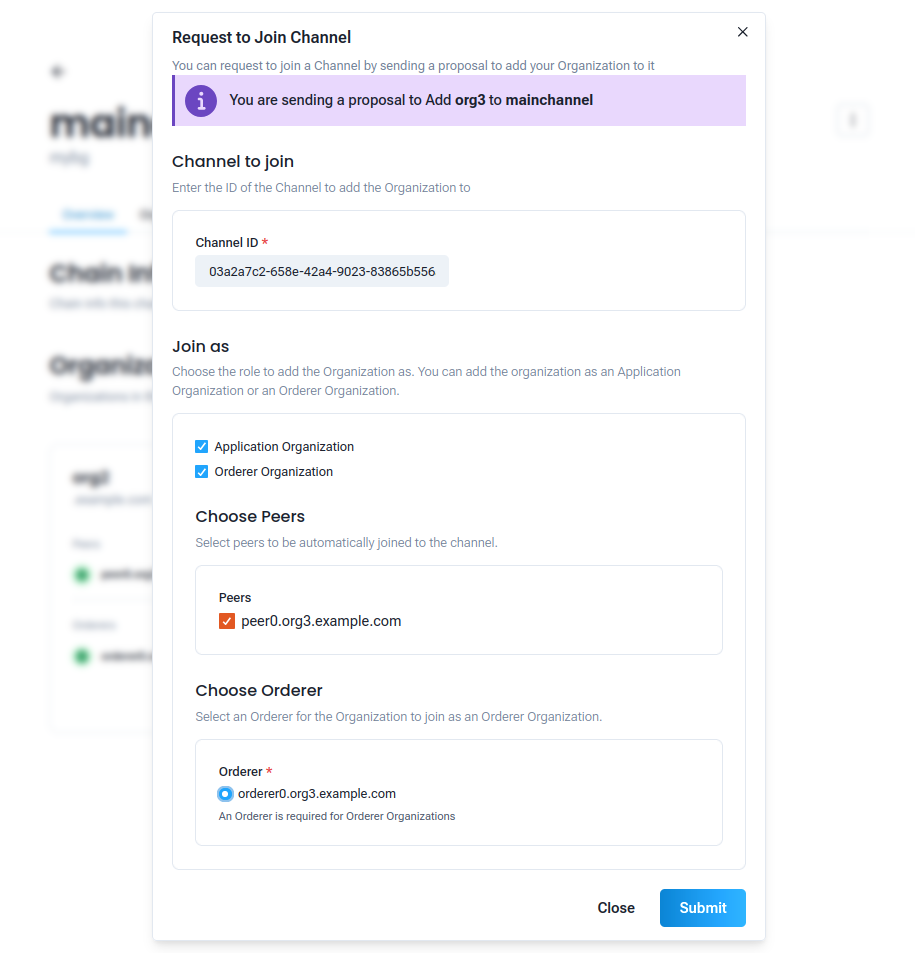 Figure 5: Example of adding an organization to a channel
Adding External Organizations to a Channel
Creating a proposal to add an organization that is not in the GoServices platform involves a different process.
- Navigate to the Channel Dashboard: In the left sidebar of the business group dashboard, you will see a Channels tab. This tab allows you to view and manage the channels associated with your business group.
- Select the Channel: Click on the channel name to go to the channel dashboard.
-
Adding an External Organization: With the organization you want to add to the channel:
- Click on the three dots on the top right of the channel dashboard and select Add External Org in Channel.
- Select the organization you want to add to the channel.
- Select which roles you want to assign to the organization in the channel:
- Application: You will be able to select the peers that will be part of the channel.
- Orderer: You will be able to select the orderers that will be part of the channel. If selecting this option, you will also need to provide the Orderer Host, Orderer Port, and TLS Certificate of the orderer.
- Click on Submit to create the proposal to add the organization to the channel.
 Figure 6: Example of adding an external organization to a channel
Warning
The process of joining an external organization will only be finalized after the proposal is accepted and the peer join and osnadmin join (if applicable) commands are executed by the organization that owns the node. This is necessary to ensure that the external organization is properly added to the channel and can participate in the channel activities.
Accepting the proposal
Once you have created the proposal to add an organization to the channel, the proposal will be sent to the selected organizations for approval. The organizations can accept or reject the proposal. If the organization accepts the proposal, it will be added to the channel and will be able to participate in the channel activities.
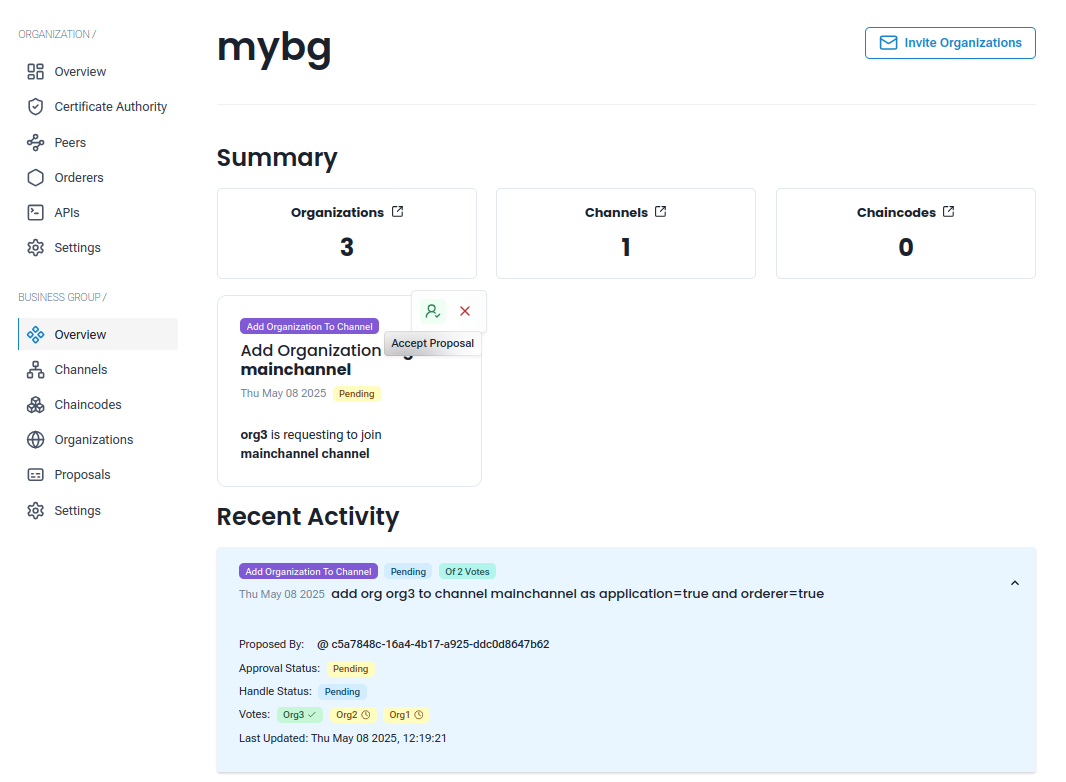 Figure 6: Example of proposal to add an organization to a channel
After the proposal is accepted, the invited organization will be able to see the channel in their dashboard and will be able to participate in the channel activities.
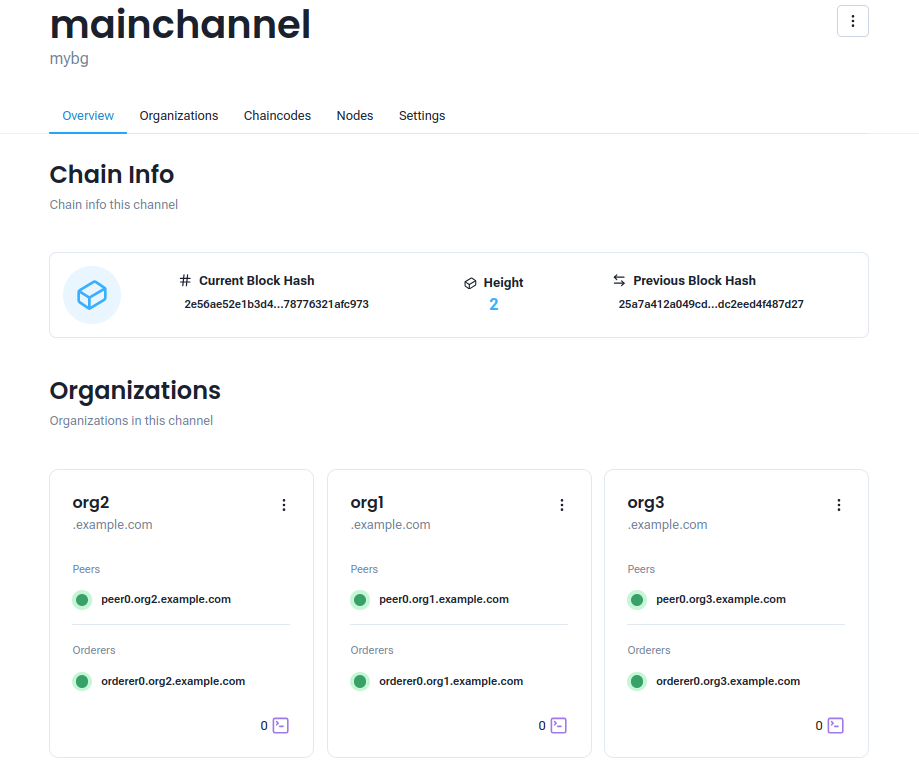 Figure 7: Example of channel dashboard after adding an organization
Add Nodes to a Channel
The addition of nodes to a channel is done by the organization that owns the node. The organization must be part of the channel as an Application to add peers, or as an Orderer to add orderers.
Adding a Node
To add a node to a channel, follow these steps:
- Navigate to the Channel Dashboard: In the left sidebar of the business group dashboard, you will see a Channels tab. This tab allows you to view and manage the channels associated with your business group.
- Select the Channel: Click on the channel name to go to the channel dashboard.
-
Adding a Node: With the organization that owns the node you want to add to the channel:
- Click on the three dots on the top right of the channel dashboard and select Add Peer/Orderer.
- Select which nodes you want to add to the channel.
- Click on Submit to create the proposal to add the node to the channel.
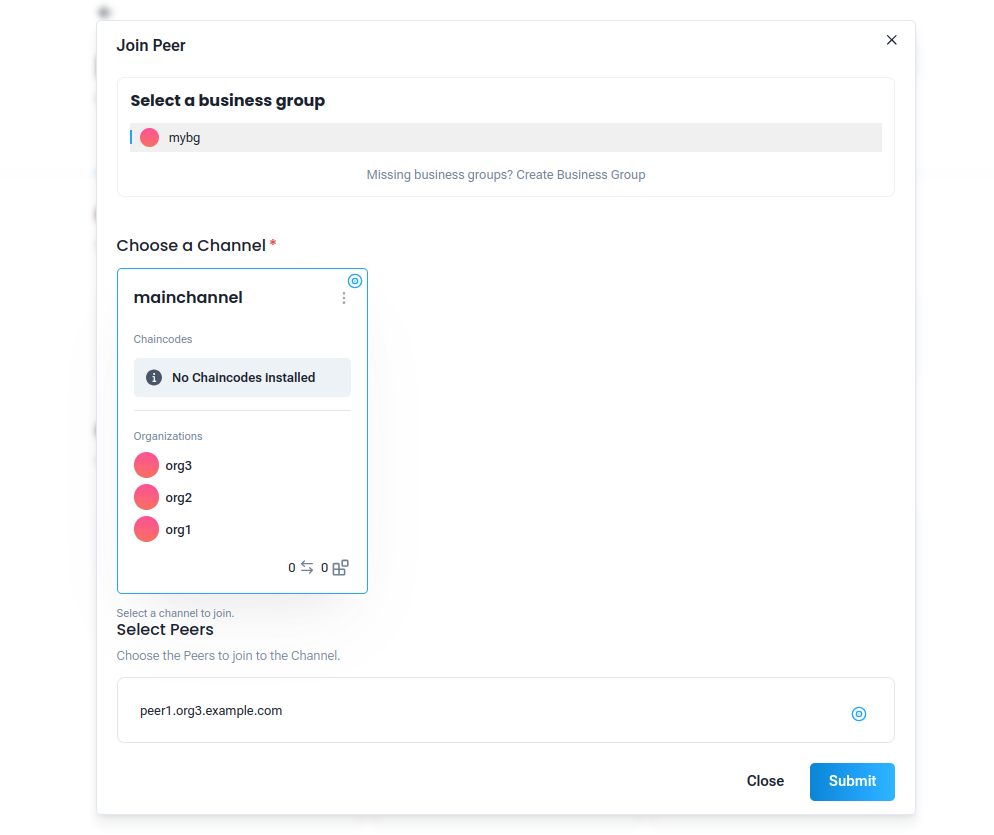 Figure 8: Example of adding a node to a channel
In contrast to adding an organization, the addition of nodes to a channel does not require the approval of the other organizations. The organization that owns the node can add the node to the channel directly. After the submission of the proposal, the node will be added to the channel and will be able to participate in the channel activities.
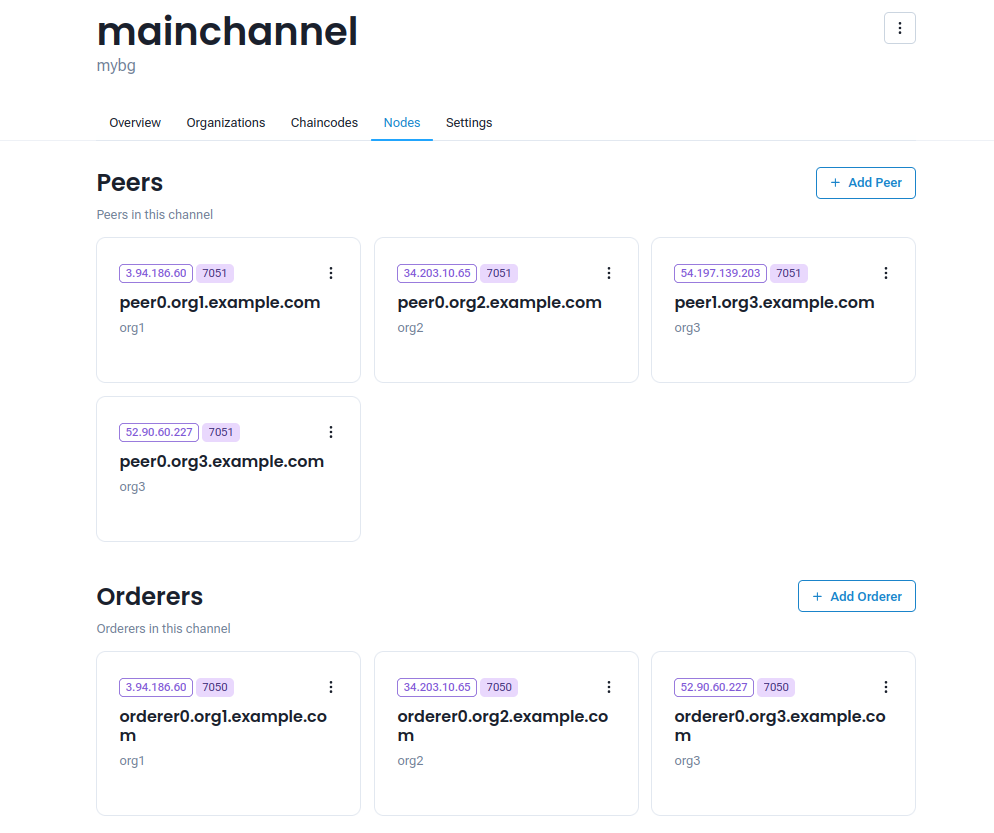 Figure 9: Example of nodes dashboard after adding a node
Export channel configuration block
You can export the channel configuration block by clicking on the Download Config Block button in the three dots menu on the top right of the channel dashboard. You can also select the format in which you want to download the config block, either as a protobuf or JSON file.
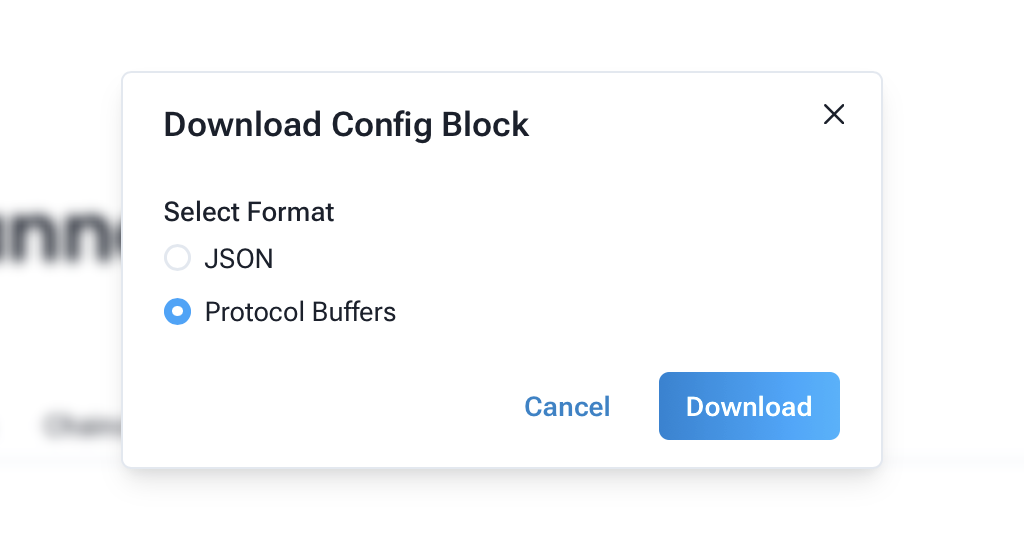 Figure 10: Example of exporting the channel configuration block
Next Steps
Now that you have created a channel and added organizations and nodes to it, you can start using the channel to deploy chaincodes and interact with the network. You can also explore other features of GoFabric, such as managing chaincodes and transactions.
Recommended next steps:
- Deploy a Chaincode: Learn how to Deploy a Chaincode to the channel and interact with it.