Setup Guide
Welcome to the GoBesu Setup Guide! This guide will help you set up a private Ethereum network using GoBesu. GoBesu is a powerful tool that simplifies the process of deploying Besu nodes and creating a private Ethereum network tailored to your needs.
- Create Organization
- Create Infrastructure
- Set Up Virtual Machines
- Create Business Group
- Create Network
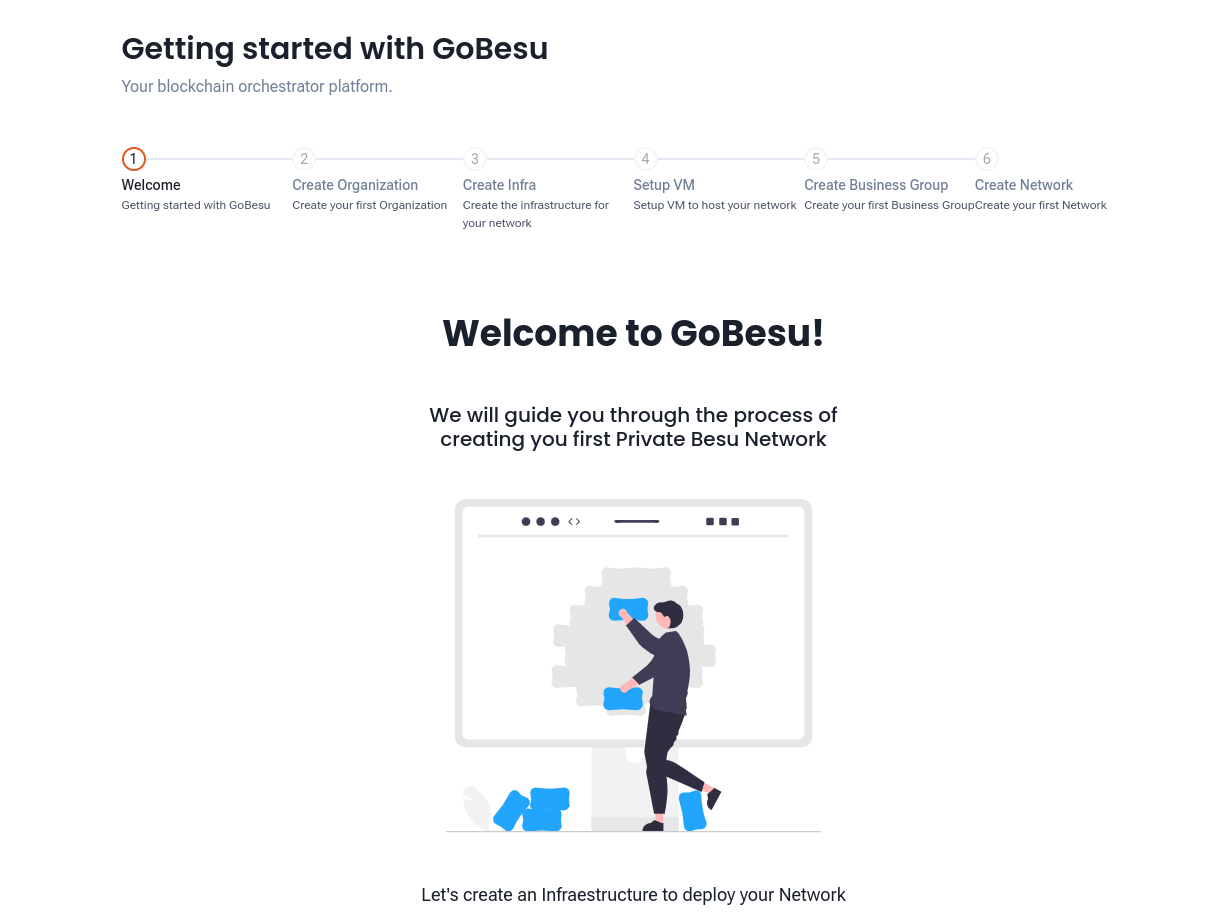
Welcome Screen
Before diving into the setup, let's begin by introducing you to the GoBesu platform.
GoBesu allows you to easily set up and manage Ethereum networks, and this guide will walk you through creating an organization, setting up infrastructure, configuring virtual machines, and establishing a business group and network. This setup will allow you to launch a fully-functional Ethereum-based network for your use case.
What You'll Need:
- A GoChain account (sign up if you don't have one yet)
- Basic knowledge of Ethereum and blockchain concepts
- Access to your cloud infrastructure (AWS, GCP, Azure or an external provider of your choice)
Create Organization
Once you're familiar with the GoBesu platform, the first thing you'll need to do is create your organization. This step is crucial, as it forms the foundation of your blockchain network. Your organization will serve as the entry point for all the entities involved in your private Ethereum network, including nodes, validators and eth clients.
Start from Scratch
You can create a full network from scratch by setting up organizations, business groups, and network all at once. Alternatively, you can create just a single organization to begin with.
Create Your First Organization
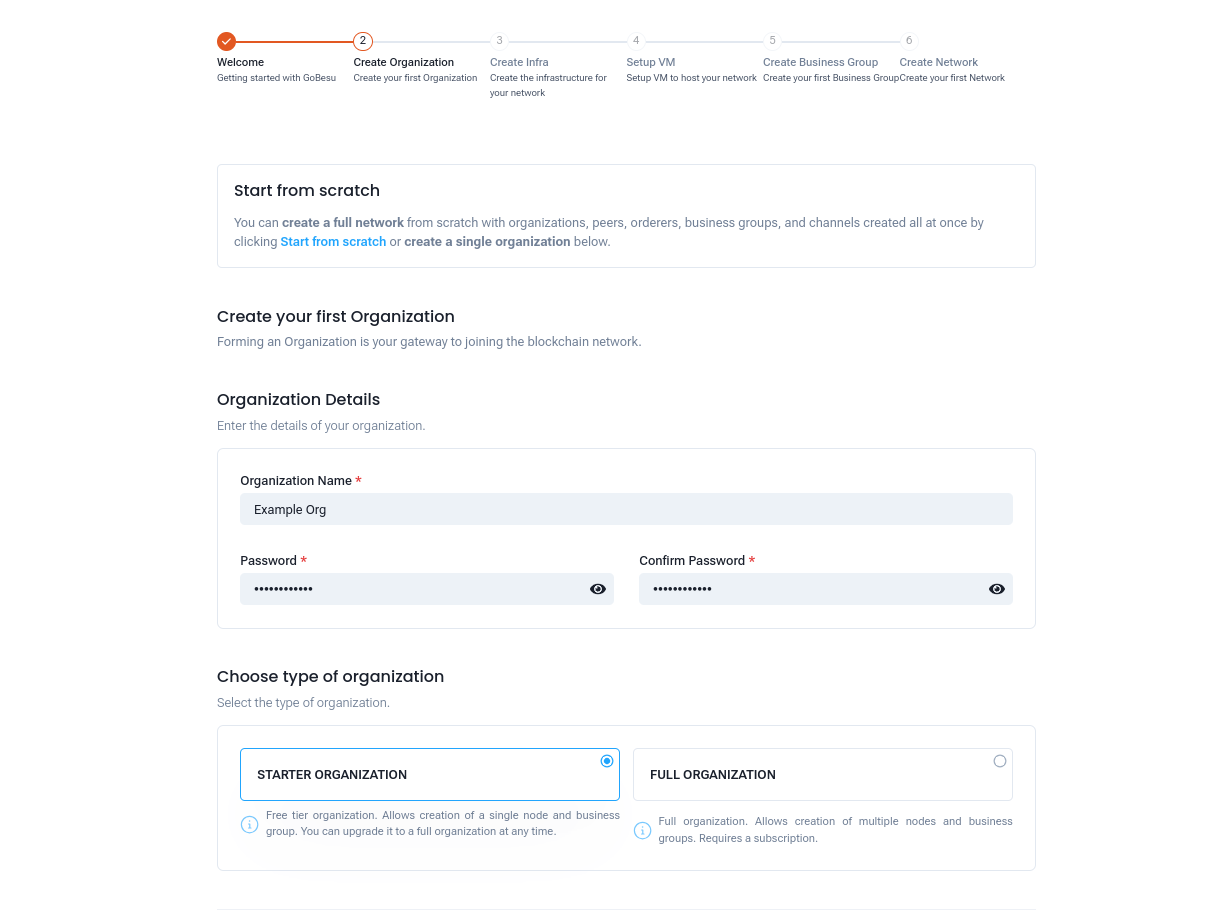
Forming an organization is the key step to joining the blockchain network. You will need to provide some basic details for your organization, such as its name, password, and type.
Organization Details
Fill in the following information to create your organization:
- Organization Name: Choose a name for your organization (e.g., Example-Org).
- Password: Enter a secure password for your organization.
- Confirm Password: Re-enter the password for confirmation.
-
Choose Type of Organization: Select the type of organization based on your needs.
-
Starter Organization: The free-tier option allows you to create a single node and business group. You can upgrade to a full organization at any time.
- Full Organization: This option requires a subscription and allows the creation of multiple nodes and business groups, offering more flexibility and scalability for larger projects.
Once you've entered your organization's details and selected the type, click on the "Create Organization" button to proceed.
Wait for Organization Creation
After submitting your organization's details, you will need to wait for the creation process to complete. This may take a few moments.
Secret Phrase and Security
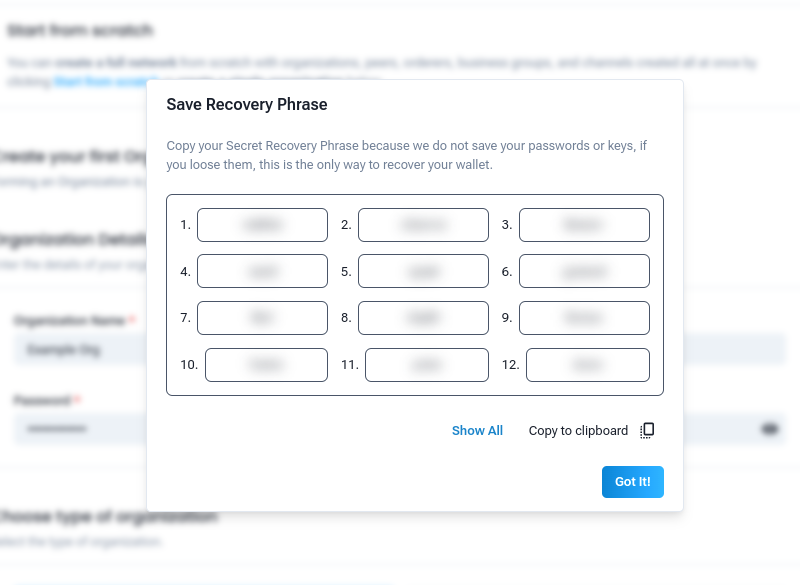
Once your organization is created, a secret phrase will be generated for your organization account. This phrase will be displayed on the screen as part of the account setup. It is important to save this secret phrase in a secure location, as it is the only way to recover or access your account if needed.
The secret phrase is created to ensure the security and integrity of your account. It acts as a backup for the encryption keys and helps protect your organization’s sensitive data from unauthorized access. Do not share or lose this secret phrase, as losing it can result in the inability to access your organization account.
Make sure to store it in a secure, offline location that only authorized individuals can access.
Create Infrastructure
After setting up your organization, the next step is to create the underlying infrastructure for your network. An "Infrastructure" refers to an instance of your cloud provider that allows you to set up virtual machines (VMs). You can either create a new infrastructure or skip this step if you already have one set up.
Create Your First Infrastructure
If you don't have an existing infrastructure, you'll need to create one. GoChain supports several cloud providers, allowing you to choose the one that best fits your needs. These providers are:
- External Provider: Set up your infrastructure on your own servers.
- Amazon Web Services (AWS): Create infrastructure on AWS using your access keys.
- Google Cloud Platform (GCP): Set up your infrastructure on GCP.
- Microsoft Azure: Use Azure to set up infrastructure.
- GoLedger: A provider where you don’t need to manage the infrastructure yourself. (Coming soon)
Choose a Provider
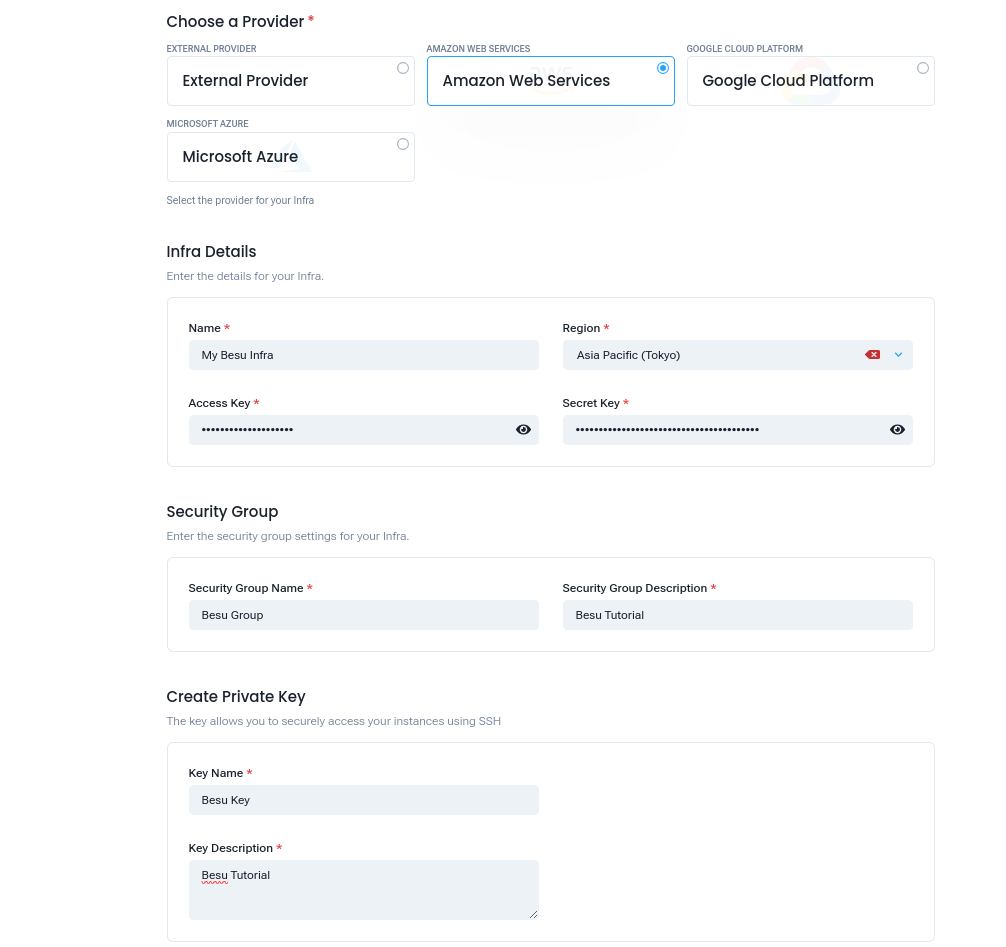
Select the provider for your infrastructure from the following options:
- External Provider
- Amazon Web Services (AWS)
- Google Cloud Platform (GCP)
- Microsoft Azure
Infrastructure Details
After selecting the provider, enter the following details for your infrastructure:
- Name: Enter a name for your infrastructure (e.g., "My Besu Infra").
- Region: Choose the region where your infrastructure will be located (e.g., Asia Pacific (Tokyo)).
- Access Key: Enter your cloud provider's access key.
- Secret Key: Enter your cloud provider's secret key.
Security Group
Configure the security group settings for your infrastructure:
- Security Group Name: Provide a name for the security group (e.g., "Besu Group").
- Security Group Description: Enter a description for the security group (e.g., "Besu Tutorial").
Create Private Key
To securely access your virtual machines via SSH, you will need to create a private key:
- Key Name: Enter a name for your SSH key (e.g., "Besu Key").
- Key Description: Provide a description for the key (e.g., "Besu Tutorial").
Once you have filled out the necessary details, click on the "Create Infra" button to set up your infrastructure.
Set Up Virtual Machines
After creating the infrastructure, the next step is to set up the virtual machines (VMs) that will host your Ethereum nodes. These VMs are essential for running your blockchain network, so it’s important to configure them properly.
If you already have a virtual machine set up, you can skip this step. Otherwise, you’ll need to create a new VM in your selected infrastructure.
Set Up a Virtual Machine
A Virtual Machine (VM) in your infrastructure will host the nodes for your Ethereum network. You’ll need to provide several details to configure the VM, such as instance type, SSH connection settings, and security groups.
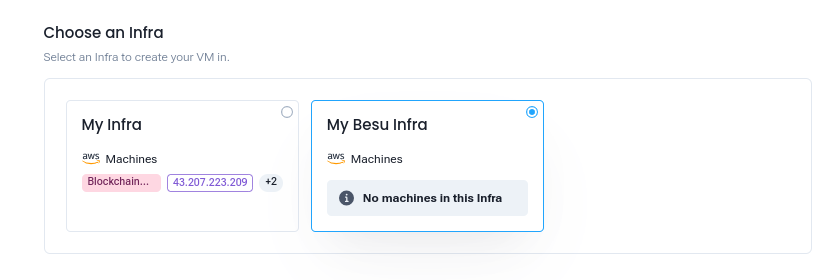
Choose an Infra
First, select the infrastructure where you want to create the VM. You can either choose an existing infrastructure or set up a new one:
Instance Type
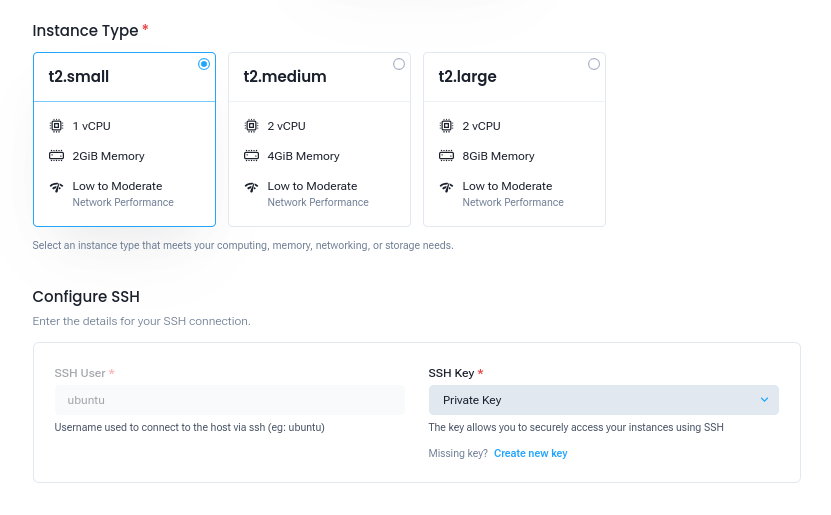
Select the type of instance that best suits your computing, memory, and network performance needs. You can choose from several instance types:
- t2.small:
1 vCPU, 2GiB Memory, Low to Moderate Network Performance - t2.medium:
2 vCPU, 4GiB Memory, Low to Moderate Network Performance - t2.large:
2 vCPU, 8GiB Memory, Low to Moderate Network Performance
Choose an instance based on the needs of your network and the expected load.
Configure SSH
To securely access your virtual machine, you will need to configure SSH. Enter the following details:
- SSH User: Enter the username used to connect via SSH (e.g.,
ubuntu). - SSH Key: Select your private SSH key for secure access. If the key is missing, create a new one for your machine.
Virtual Machine Details
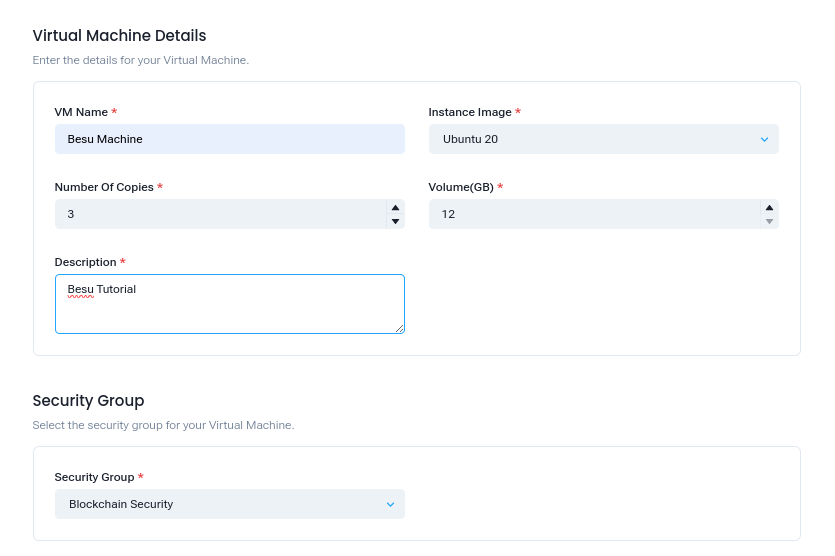
Now, configure the specifics of your virtual machine:
- VM Name: Enter a name for your virtual machine (e.g., "Besu Machine").
- Instance Image: Select the operating system image for your VM (e.g., Ubuntu 20).
- Number of Copies: Specify the number of copies of the VM to create (e.g., 3).
- *Volume (GB): Define the disk space for your VM (e.g., 12 GB).
- Description: Provide an optional description for your VM.
Security Group
Select the appropriate security group for your virtual machine to control its inbound and outbound network traffic:
- Security Group: Choose a security group (e.g., "Blockchain Security").
Once you have entered all the necessary details, click on the "Setup VM" button to finalize the setup.
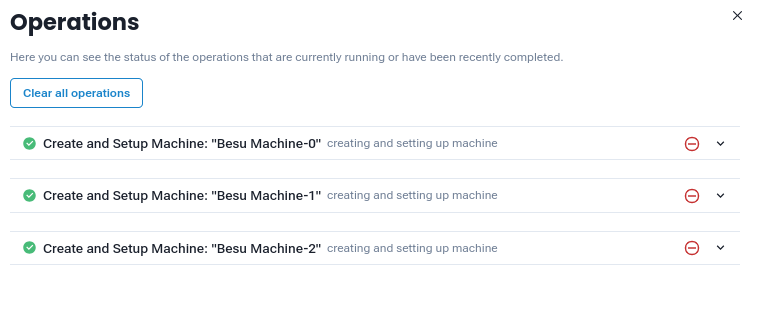
Wait for Virtual Machine Creation
After submitting the configuration, the virtual machines will start to be created. This process might take a while, depending on your infrastructure provider and selected VM settings. Please be patient as the creation of the virtual machines may take a few minutes.
Once the creation process is complete, you will have your virtual machines ready to use, and you can proceed with the next steps in setting up your network.
Create Business Group
A Business Group in GoBesu helps manage multiple entities within your network. This group will define the roles of different participants and provide a structure for creating and managing nodes and smart contract. The Business Group acts as a gateway for interacting with the blockchain network.
Select an Organization
First, choose the organization for which you want to create the Business Group. You can select an existing organization or create a new one:
- Choose an Organization*:
Select the organization to which your Business Group will belong (e.g., "Example-Org").
Business Group Details
Next, provide the details for your Business Group:
- Name*: Enter the name of your Business Group (e.g., "Blockchain Business Group").
- Description*: Provide a description for your Business Group (e.g., "This group handles blockchain operations and management").
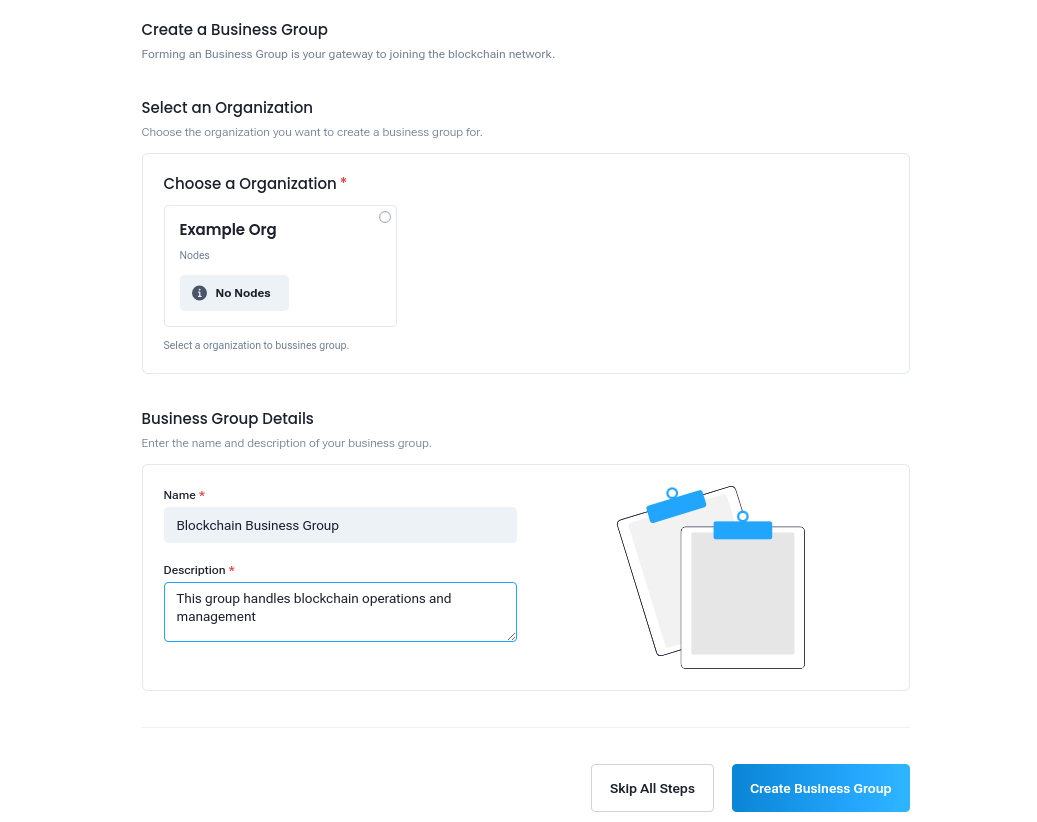
Once you have entered the necessary details, click to create your Business Group.
The Business Group you create will play a crucial role in setting up nodes, validators, and defining the responsibilities of participants in your Ethereum network.
Create Network
The final step involves creating the actual blockchain network. This includes specifying the network's consensus mechanism, configuring the nodes, and setting parameters that define how the nodes will communicate and validate transactions. After setting up the network, you will have a private Ethereum network up and running!
Select a Business Group
Before creating the network, you first need to select the Business Group where the network will be associated. The Business Group defines the roles and responsibilities of different participants within the network. By choosing the appropriate Business Group, you ensure that the new network will adhere to the right structure and permissions.
- Business Group*:
Select the Business Group (e.g., "Blockchain Business Group") where you want to create the network. This will group the network under a specific entity in the system.
Create Your First Network
Forming a network is your gateway to joining the blockchain. You can either create a new network or import an existing one. This step sets up the foundation for your private Ethereum network.
- Choose an Operation:
- Create a Network: Use this option to create a fresh network from scratch. This is ideal if you are setting up a completely new blockchain environment for your project.
- Import a Network: If you have an existing network, you can import it into the system. This is helpful if you are migrating or integrating with a pre-established blockchain infrastructure.
Network Details
In this section, you'll define key characteristics of your network. These details ensure that your network operates according to your specific needs, including choosing a consensus mechanism and describing its functionality.
- Name*: Enter a name for your network (e.g., "Example Network"). This name will be used to identify the network within the platform.
- Type*: Choose the consensus mechanism (e.g., "QBFT"). The consensus mechanism determines how transactions are validated and blocks are produced within the network. QBFT (Quorum-Based Byzantine Fault Tolerance) is a widely used mechanism for permissioned blockchain networks.
- Description: Provide a description for your network. This helps in identifying the purpose and role of the network, which can be useful for team collaboration and future reference.
Custom Network Properties
In this section, you’ll define additional properties to customize the network's behavior. These parameters control how the network allocates resources and handles transactions.
- Define Custom Alloc:
Define the starting balance for a list of accounts in your private network. This ensures that participants have an initial allocation of funds to interact with the network. The balance is specified in wei, the smallest unit of Ether (1 Ether = 10^18 wei).
Note: It is important to add your default account of your organization in alloc with predefined balance to be able to deploy your smart contracts. You can access your account address and details in account tab.
- Click the button to add allocation for specific accounts.
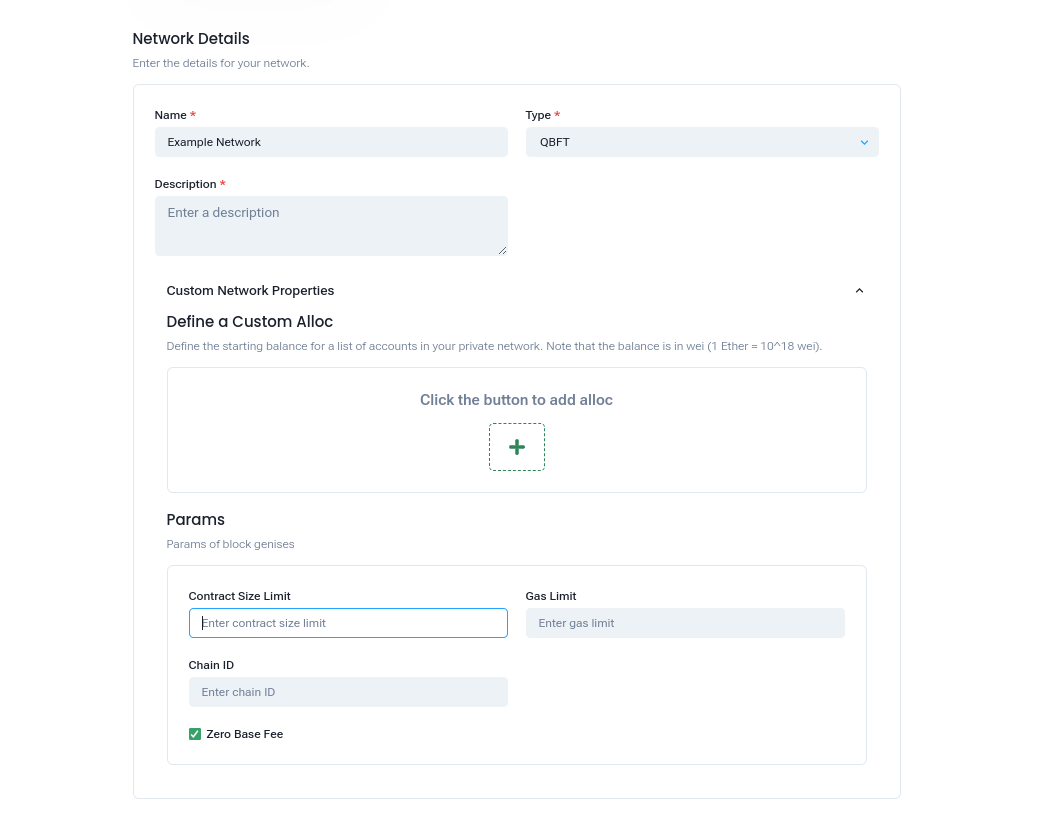
Params
These parameters are vital for determining how your network operates at the system level, including how transactions are processed and validated.
- Contract Size Limit: Enter the contract size limit. This determines the maximum size of contracts that can be deployed on your network, preventing overly large contracts from clogging the system.
- Gas Limit: Enter the gas limit. Gas is used to measure the computational work required for transactions on the Ethereum network. The gas limit ensures that transactions do not exceed a defined threshold, protecting the network from excessive resource consumption.
- Chain ID: Enter the chain ID. The chain ID uniquely identifies your blockchain network. It is essential for differentiating between multiple networks that may use similar protocols.
Node Configuration
Once the network parameters are set, you’ll need to select the nodes that will participate in the network creation as boot node.
- Node Name*: Enter the name of your node (e.g., "besu0.Example Org"). This name is used to identify the specific node within the network.
- Network Host*: Choose the host for your node (e.g., "Besu Machine-0"). The host is where the node's infrastructure resides, typically a virtual machine (VM) or a physical machine in your cloud provider.
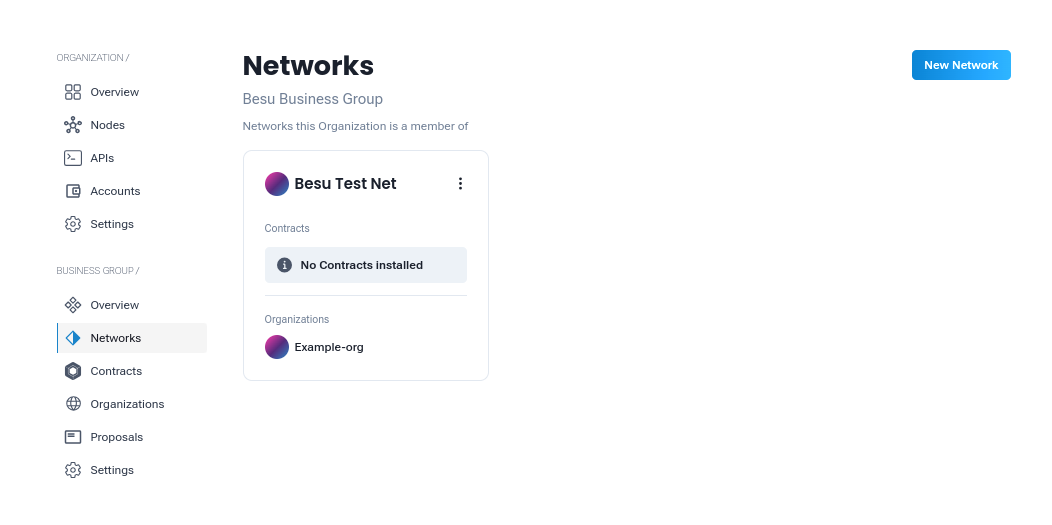
Once the network is created, you’ll have your private Ethereum network up and running, ready for blockchain operations and interactions. The network setup is now complete, and you can add other nodes to your network.
Next Steps
Now that you've successfully set up your private Ethereum network, you can start deploying smart contracts, add Nodes to your network, and more!
Recommended next steps:
- Add Nodes To Network: Learn how to Add Nodes to your network.
- Create Smart Contracts: Learn how to Create Smart Contracts to your network.
- Deploy Smart Contracts: Learn how to Deploy Smart Contracts to your network.
- Manage Organizations: Learn how to manage Organization.
This setup guide will evolve over time with more detailed instructions and visual aids, so stay tuned for more updates!