Add Nodes to Network
Navigate to the Nodes Tab
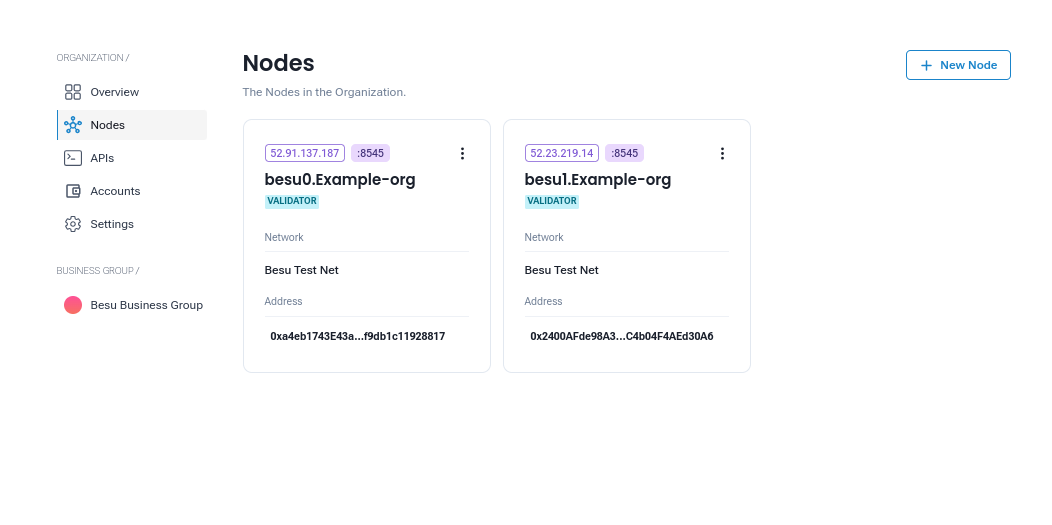
To begin the process of adding a node to your network, navigate to the Nodes tab from your network's dashboard or menu. In this tab, you will see a list of existing nodes currently part of your network.
- This section allows you to manage and monitor your nodes, including adding new nodes to the network.

Step 2: Click on the + New Node Button
Once you are in the Nodes tab, click on the + New Node button. This will open a pop-up screen that guides you through the process of adding a new node.
Selecting the Business Group
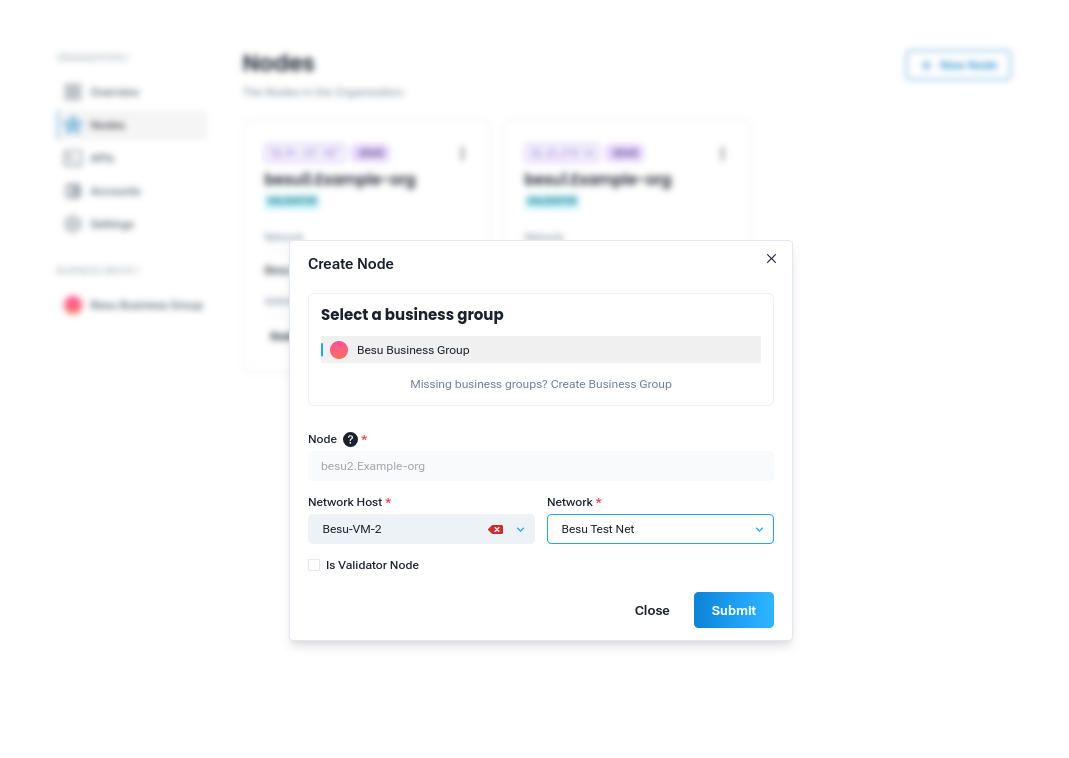
- In the pop-up, you will first be prompted to select a Business Group from a dropdown list. A Business Group is a logical grouping of organizations or entities within the network.
Warning: Only organizations with a status of Full are permitted to add nodes to the network. If your organization is not marked as Full, you'll have to first upgrade you organization to Full Organization.
For organization upgrade refer to our Organization Guide
- What is a Full Organization?
- A Full Organization is an organization that has completed all the necessary verifications and has been granted the required privileges within the network to perform advanced operations like adding new nodes.
- If your organization is not yet a Full organization, you will need to follow the provided link to convert it to Full status before proceeding with adding a node.
Step 3: Fill in Node Details
Select a Business Group
- From the dropdown list, select the Business Group that this new node will belong to. Ensure that you are selecting the correct business group to ensure proper association within your network.
Missing Business Groups?
- If the desired business group is not available in the list, you can click on the Create Business Group link to add a new business group. This will allow you to add a new group if it does not already exist in the system.
Once a Business Group has been selected, the user will need to fill out the following required details to complete the node creation process.
Node Details

-
Node Name: You are required to provide a name for the new node. The name should be unique and easily identifiable (e.g.,
besu2.Example-org). The node name will serve as an identifier within the network. -
Network Host:You will need to enter the Network Host where the node will be hosted. This refers to the server or machine that will host the node.
Warning: Ensure that the Network Host you are entering is not already in use by another node in any existing networks. Also Make sure that its not being used by any other network.
-
Network:Select the Network to which the node will be added. The network is where the node will operate and interact with other nodes. Typically, you will select the network where your organization is currently active or the one you want the new node to be part of.
-
Validator Node:Optional: If you want the node to serve as a Validator Node, you can check the Validator Node box. Validator nodes play a crucial role in consensus mechanisms and block validation in blockchain networks. Only select this if you intend the node to be part of the consensus process.
Step 4: Submit the Node Request
Once all the details have been filled in correctly, click the Submit button. At this point, the system will begin processing your request. Please note that this process may take some time to complete as the node is being added to the network.
- During this time, the system will verify the provided details (such as the network host) and perform any necessary checks to ensure everything is configured correctly.
- What Happens After Submission?
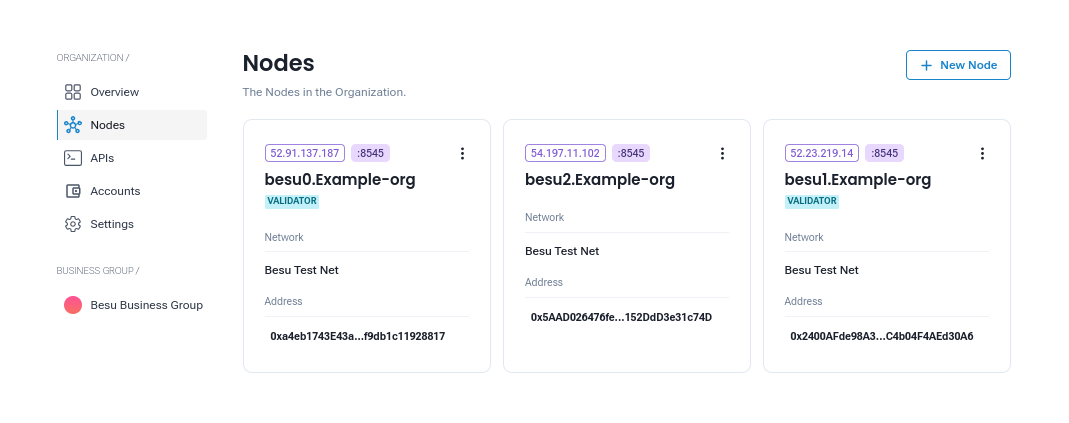
- After submission, the system will automatically add the new node to the selected network. This may take a few moments to complete.
- The new node will now be visible in the Nodes tab under the selected Business Group and network.

By following these steps, you will successfully add a node to your network and integrate it with the blockchain network. If you face any issues, check the system logs or reach out to support for assistance.
Recommended next steps:
- Create Smart Contracts: Learn how to Create Smart Contracts to your network.
- Deploy Smart Contracts: Learn how to Deploy Smart Contracts to your network.
- API: Learn how to create and manage Eth API.